Add a user to the SharePoint_Shell_Access role for all SharePoint 2010 content databases

In order to use Windows PowerShell for SharePoint 2010 Products, a user must be a member of the SharePoint_Shell_Access, and you can do that via Add-SPShellAdmin cmdlet. However if user needs to work with a lot of content databases then you need to repeat this procedure over and over. Here is a simple script that will add a user to the SharePoint_Shell_Access role for all content databases.

1if((Get-PSSnapin | Where {$_.Name -eq "Microsoft.SharePoint.PowerShell"}) -eq $null) {
2 Add-PSSnapin Microsoft.SharePoint.PowerShell;
3}
4cls
5$username = Read-Host "Enter username";
6Get-SPContentDatabase | ForEach-Object {Add-SPShellAdmin -UserName $username -database $_.Id}


Use case: Managing Job Applications with SharePoint

I recently hired two employees for my company. The process is usually simple, an opening is posted on local jobs site and all the job applications are received via email. As we always require applicants to submit some additional forms and to complete a small writing or code development task it's sometimes hard to track the progress of each candidate. This time it was even harder because three persons were in charge of reviewing all these materials.

SharePoint solution

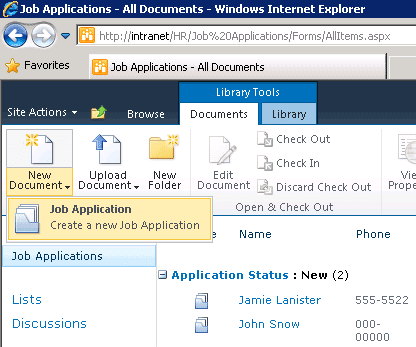
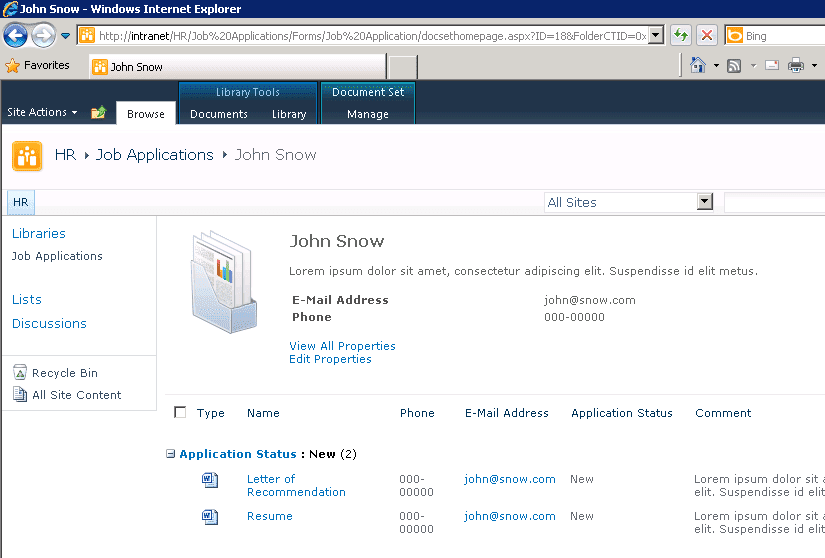
To speed-up this process I decided to implement a very simple solution on top of SharePoint 2010. The solution still requires a lot of manual upload of documents but it is no-code solution so it does not require any special skills or effort to implement it. I created a document library with Document Sets. Each document set represents a job applicant and contains all the documents submitted. It also contains information about current application status and additional comments. The final solution looks like this:

Document Library with Job Applications

Document Library with Job Applications

Walkthrough

  • Make sure the following features are activated on site collection level: Document Sets, SharePoint Server Standard Site Collection features.
  • Create a site for job applications e.g. http://intranet/hr and navigate to it.
  • Make sure Site feature SharePoint Server Standard Site features is activated.
  • Navigate to Site Actions > Site Settings > Galleries > Site Content Types.
  • Click Create button and fill the new form with following data:
    • Name: Job Application
    • Select parent content type from: Document Set Content Types
    • Parent Content Type: Document Set
    • Put this site content type into: Custom Content Types (or create a New group)
  • Click OK button to save
  • A new page will open allowing you to configure your content type and add columns, click Add from new site column link
  • Add the following columns:
    • E-mail Address (Type: Single line of text)
    • Phone (Type: Single line of text)
    • Application Status (Type: Choice)
      I entered the following options: New, Phase 1, Phase 2, Phase 3, Rejected, but you can add phases of your own job application handling process.
  • On the settings page for the Job Application content type you can also configure Document Set settings e.g. configure Shared Columns and Welcome Page Columns
  • Create a new document library or navigate to the one that already exists on your site and then navigate to Document Library Settings page.
  • Click Advanced Settings.
  • Select Yes for the Allow management of content types option.
  • Click OK button to save the settings.
  • From the Content Types section click Add from existing site content types and add the content type you created in previous steps.
  • The list will now show Document and Job Application content type. You can use Change new button order and default content type link to remove the Document content type from New button and to make Job Application default content type
  • Once configured the New button on the Document Library ribbon will show only Job Application content type.
  • Additional steps: Make sure you configure your Document Library views according to your needs e.g. Group by Phase or Filter by user etc.

Using the solution

Using this solution is very simple:

  • Click New button on the Document library ribbon to create a new Job Application
  • Fill the Name of the new applicant and other contact details
  • Once saved applicants will be listed in the document library. Click on applicant name to add or preview attached documents like resume, letters of recommendation and other files.

Future Improvements

The entire solution could be further improved with SharePoint incoming email feature. This would allow us to automatically convert all the documents to items in a SharePoint Document Library. However OOTB incoming email feature is very simple and does not allow any intelligent email routing. To implement intelligent routing (e.g. to automatically recognize someone replying to an existing job application) you would need to write some SharePoint event handlers. For completely automated solution you would have to implement some SharePoint workflows that would automatically send emails when job application changes states etc.


Localizing CoreSearchResults Web Part with XSLT

I recently had to create a custom formatting via XSLT for SharePoint CoreSearchResults Web Part. This is not very complicated, and has been around since SharePoint 2007 (Customizing Enterprise Search Results). This time, however, we had to localize the XSLT transformation so that it displays different labels based on SharePoint UI language selected.

A colleague of mine, Vinko Bedek, managed to solve this, here is what you need to do:

  • Resource file (e.g. YourResourceFileName.resx) must be placed in inetpub directory e.g. C:\inetpub\wwwroot\wss\VirtualDirectories\80\App_GlobalResources
  • Parameter binding must be created for each resource you plan to use e.g.
<ParameterBinding Name="ParameterName" Location="Resource(YourResourceFileName,NameOfResourceToBeExtracted)">
  • Use the following syntax to display the value:
<xsl:value-of select="$ParameterName"/>


Walkthrough: Add tabs for custom scopes in Enterprise Search Center

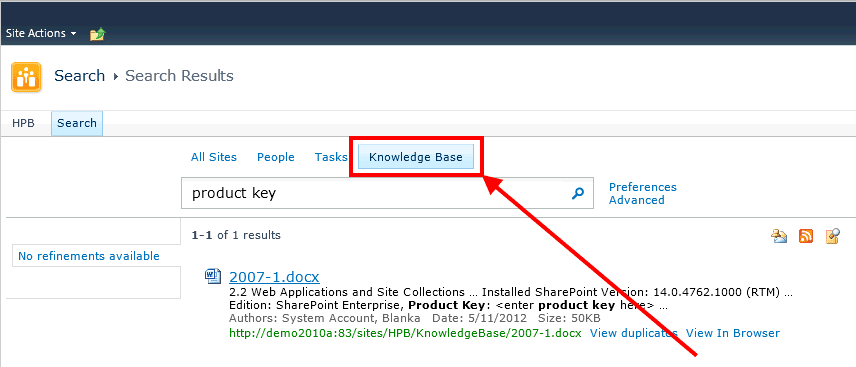
When configuring SharePoint Search for customers I often help them configure their SharePoint Enterprise Search center. Companies usually index various content: SharePoint, Web Sites, File Shares, and it's always good to divide different content sources with tabs, just as popular Search Engines like Google and Bing do.

Google Search with Tabs

Google Search with Tabs

So what do you need to do to have something similar in your SharePoint site? Here is the complete walkthrough.

Configuring Search Scopes

Before configuring search scopes you have to properly configure Content Sources, you should also read about managing Search Scopes.

  • Login to SharePoint Central Administration
  • Navigate to Central Administration > Application Management > Manage Service Applications > Your Search Service Application
  • In the Quick Launch click Scopes
  • Create a new scope: MyCustomScope
  • Once the scope is created, click Add Rules to add rules
  • Configure your scope to filter only results you want to display here e.g. only files from your file share
  • Save

Configuring Search Tabs

To configure Search Center you first need to create one (make sure SharePoint Standard and Publishing site collection features are enabled). I recommend installing SharePoint 2010 Master Page Adapters for Search so that your Search Center gets normal navigation.

Here is what you need to do to configure search pages:

  1. Navigate to your Search Centar
  2. Click Site Actions > New Page
  3. Enter page name, e.g.: MyCustomPage
  4. New page will open in Edit mode
  5. Find the Search Core Results web part and from the context menu choose the Edit Web Part option
  6. In the Web Part properties pane in the Scope field enter MyCustomScope
    (this field is located in the Core Results > Location properties group)
  7. Click Apply and then OK to close Web Part Pane
  8. Open Search Box web part properties with Edit Web Part option
  9. Enter MyCustomPage.aspx to Target search results page URL field in the Miscellaneous group
  10. Click Apply and then OK to close Web Part Pane
  11. Click Save on the Page ribbon to save the page
    Please note: If Pages library requires Check-in or approval, make sure you do both otherwise this page will only be visible to admins.

There are two lists you need to configure to get search tabs in place, these lists are located at:

  1. http://your_site_collection/your_search_site/SearchResults/AllItems.aspx
  2. http://your_site_collection/your_search_site/SearchCenter/AllItems.aspx

Add links to the MyCustomScope.aspx page.

After you have completed this you will have a new tab in your search center.

Enterprise Search Center with custom tab


Juice up your SharePoint with SharePoint Cool Buttons

When working with customers one often hears the following complaint: "Wow, this SharePoint is sooo ugly…". I personally think SharePoint 2010 has very nice nice and professional design, but since customer is always right, from time to time I need to make it look more pretty. For some customers the "fix" is very simple, just add some nice looking buttons on the home page and they will be very happy with this improvement.

Couple of things that your customer needs to be able to do:

  • Add/Remove buttons easily
  • Add icons to buttons
  • Rearrange buttons as web parts
  • Change layouts i.e. order buttons vertically vs. horizontally

To allow them such a functionality I created a SharePoint Sandboxed solution that glues together some JQuery UI Buttons and a SharePoint Links list. When combined together these solutions allow you to get buttons like these:

To deploy this web part you need to do the following:

  • Download and unpack solution package
  • Go to your Site Collection > Site Actions > Site Settings
  • Browse Galleries > Solutions
  • Click on the Solutions ribbon tab and click Upload Solution button
  • Upload the WSP package you downloaded and Activate it
  • Navigate to the Site Settings > Site Collection Administration > Site Collection Features of your site collection and make sure feature SharePoint Accelerators – Cool Buttons Web Part is activated
  • Navigate to the desired SharePoint (sub)site and activate SharePoint Accelerators – Cool Buttons site feature
  • Navigate to Cool Links list and add some links (if defined, icons will be displayed with your link description)
  • Add Cool Links Web Part to a SharePoint Page

Web Part Options

Cool Links WebPart has the following options that allow SharePoint admins to change how these buttons will be generated. All these options are accessible via Edit Web Part in the Miscellaneous section.

  • Links list – The names of lists with links that will be displayed. Defaults to Cool Links.
  • List View – List view that will be used to filter and sort items. Defaults to default view.
  • Display Type – Choose if your buttons will be Resizable, FixedSize (defined via Button width property) or full size of the webpart (WebPartSize).
  • Button Layout – Choose between Horizonatal and Vertical button layout.
  • Button width (px) – When FixedSized display type is used, it allows you to define button width in px.


Document farm configuration settings in SharePoint Server 2010 – SPDocKit 2.0

I forgot to post this earlier, but last month we released a major release of Documentation Toolkit for SharePoint 2.0 (SPDocKit) . The product has been on market for almost a year know and I must say we are very happy with it's progress. To this date more than 150 customers, large and small, from 25 countries decided to document SharePoint farm configuration settings with our tool. SharePoint is a complex system and documenting it is no fun. Our tool helps you with that boring part of the project (documenting it) while you can focus on more important stuff.

Documentation Toolkit for SharePoint

We built this new version based on feedback from our customers. Here are some of the new features:

As a valuable reader of this blog you can use claim code summer2012 and you will receive 10% off for your purchase. This offer is valid till July 31st 2012.


Sync your files to SharePoint 2013 or Office 365

As you probably heard SharePoint 2013 Preview has been released. There is number of cool features available but there is one that's super simple yet so very useful. I am huge fan of DropBox, this simple application allows you to sync your folders to the cloud. Now you can do the same with SharePoint 2013, no special requirements to configure this.

Figure below shows a document library synced to my computer. All the changes are propagated back and forth. Very cool and helpful feature.


Auto populate Search suggestions for SharePoint People Search

One of mine customers wanted to replace their existing phone directory with the SharePoint OOTB user profiles. They already had all the data in the Active Directory and also had pictures for most employees, so SharePoint sounded like an obvious choice. One of the requests was to have search as you type suggestions for people search. The good news is: this already exists in SharePoint, you just just need some PowerShell magic to work correctly.

SharePoint People Search As You Type

A note from the official documentation:

Query suggestions depend on users' searches. Only search queries that have been previously returned and then clicked through at least six times will appear in either the search box list or the Related Queries Web Part. Therefore, a newly deployed SharePoint Server 2010 system will not show query suggestions in either location. Moreover, a query suggestion will only appear in the search box list or the Related Queries Web Part if the query suggestion contains at least one of the words that are typed.

This is what you need to do to configure this for your environment:

1. Execute the following script in your environment. For parts of this script I used this script by Daniel Root). Make sure you change to match your Search Service Application name (line 22) before exacting.

cls if((Get-PSSnapin | Where {$_.Name -eq "Microsoft.SharePoint.PowerShell"}) -eq $null) { 	Add-PSSnapin Microsoft.SharePoint.PowerShell; } function Enumerate-SPUserProfiles($SearchServiceApp) { 	$x= [System.Reflection.Assembly]::LoadWithPartialName("Microsoft.SharePoint") 	$x= [System.Reflection.Assembly]::LoadWithPartialName("microsoft.sharepoint.portal") 	$x= [System.Reflection.Assembly]::LoadWithPartialName("Microsoft.Office.Server") 	$x= [System.Reflection.Assembly]::LoadWithPartialName("System.Web") 	$sites = Get-SPSite 	$context = [Microsoft.Office.Server.ServerContext]::GetContext($sites[0]) 	$profileManager = new-object Microsoft.Office.Server.UserProfiles.UserProfileManager($context) 	# gets all the user profiles, those that have domain\username as DisplayName are excluded 	$profileManager.GetEnumerator() | ?{$_.DisplayName -notlike '*\*' } | foreach-object { Add-SPSuggestion $SearchServiceApp $_ } | } function Add-SPSuggestion($SearchServiceApp, $User) { 	New-SPEnterpriseSearchLanguageResourcePhrase -SearchApplication $searchapp -Language En-Us -Type QuerySuggestionAlwaysSuggest -Name $User.DisplayName } #Change to match your Search Service Application Name $searchapp = Get-SPEnterpriseSearchServiceApplication -Identity "Search Service Application" Enumerate-SPUserProfiles Start-SPTimerJob -Identity "prepare query suggestions" 

2. Navigate to your Search Center > People Search page

3. Edit People Search Web Part properties

4. Check the Show query suggestion option

Show Query Suggestions

5. Save Page

That's it! You are done!


Use Case: Export User Profiles to a SharePoint list – phonebook style

SharePoint User Profiles Service Application has a lot of nice and very useful features but it misses one small but important thing. Customers often want to display all their contacts (from User Profile Store) in a single list, phonebook style.

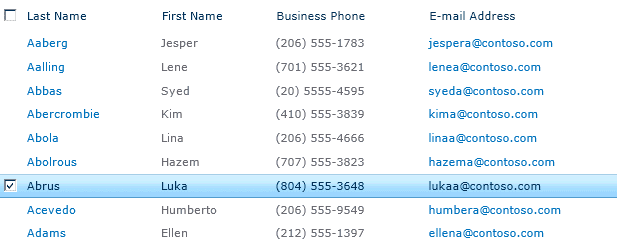
Here is a simple solution how to achieve this with a PowerShell script. The script queries the User Profile store and then copies user profile information to a simple SharePoint list (based on Contacts list template). The final result might look like this:

Please note:

  • If your company has more than 1000 employees this solution might not scale properly.
  • The script below was designed for English based SharePoint site templates, additional modifications might be required for other languages.
  • The script must be executed under user that has both read privileges to User Profile Service Application and contribute privileges for your site.

Configuration steps:

  • On your intranet/team site create a list based on the Contacts list template
  • Create an additional column in this list: UserName – Single line of text

Here is the script:

01cls
02if((Get-PSSnapin | Where {$_.Name -eq "Microsoft.SharePoint.PowerShell"}) -eq $null) {
03 Add-PSSnapin Microsoft.SharePoint.PowerShell;
04}
05function Enumerate-SPUserProfiles($webUrl, $listName)
06{
07 $x= [System.Reflection.Assembly]::LoadWithPartialName("Microsoft.SharePoint")
08 $x= [System.Reflection.Assembly]::LoadWithPartialName("microsoft.sharepoint.portal")
09 $x= [System.Reflection.Assembly]::LoadWithPartialName("Microsoft.Office.Server")
10 $x= [System.Reflection.Assembly]::LoadWithPartialName("System.Web")
11 $sites = Get-SPSite
12 $context = [Microsoft.Office.Server.ServerContext]::GetContext($sites[0])
13 $profileManager = new-object Microsoft.Office.Server.UserProfiles.UserProfileManager($context)
14 $web = Get-SPWeb $webUrl
15 $list = $web.Lists[$listName]
16 # gets all the user profiles, those that have domain\username as DisplayName are excluded
17 $profileManager.GetEnumerator() | ?{$_.DisplayName -notlike '*\*' -and $_.ProfileType -eq "User" } | foreach-object { Update-PhoneBook $_ $web $list $webUrl } |
18}
19function Update-PhoneBook($user, $web, $list, $webUrl)
20{
21 if($user.Item("FirstName") -ne "" -and $user.Item("FirstName") -ne $null)
22 {
23 $spQuery = new-object Microsoft.SharePoint.SPQuery
24 $userName = $user.Item("UserName")
25 $camlQuery = "<Where><Eq><FieldRef Name='UserName' /><Value Type='Text'>$userName</Value></Eq></Where>";
26 $spQuery.Query = $camlQuery
27 $spQuery.RowLimit = 1
28 $spListItemCollection = $list.GetItems($spQuery)
29 $domain = (gwmi WIN32_ComputerSystem).Domain
30 if($spListItemCollection.Count -ge 1)
31 {
32 Write-Host "Updating $username..."
33 Update-Contact $spListItemCollection[0] $user $domain $webUrl
34 }
35 else
36 {
37 Write-Host "Adding $username..."
38 $contact = $list.items.add();
39 Update-Contact $contact $user $domain $webUrl
40 }
41 }
42}
43function Update-Contact($contact, $user, $domain, $webUrl)
44{
45 $lastName = $user.Item("LastName");
46 $contact["Title"] = "$lastName";
47 $firstName = $user.Item("FirstName");
48 $contact["FirstName"] = "$firstName";
49 $workEmail = $user.Item("WorkEmail");
50 $contact["Email"] = "$workEmail";
51 $workPhone = $user.Item("WorkPhone");
52 $contact["WorkPhone"] = "$workPhone";
53 $CellPhone = $user.Item("CellPhone");
54 $contact["CellPhone"] = "$cellPhone";
55 $office = $user.Item("Office");
56 $contact["Office"] = "$office";
57 $department = $user.Item("Department");
58 $contact["Department"] = "$department";
59 $userName = $user.Item("UserName");
60 $contact["UserName"] = "$userName";
61 $contact.update()
62}

You can run it by typing:

1Enumerate-SPUserProfiles "http://your_site_url" "List_Name"
Tags


Visual Studio Pre/Post Deployment PowerShell for SharePoint

One of the projects that I'm working on at the moment involves deploying the same code base (Features, DLL etc) to a number of different site collections on my development vm. However, one of the aspects of Visual Studio 2010 it that it will only deploy to a single site - which you specify in the project settings. In this case it's a pain because certain elements of the Features require activation which only happens on that one site. If I deploy my latest code to http://site1 then everything is good, but then http://site2 and http://site3 have a mix of old and new (e.g. they'll have the latest DLL which are in the GAC but not necessarily page layouts, css etc). At the moment it means I have to go through each site and manually deactivate and then activate each Feature by hand. SharePoint deployments aren't always the quickest and this just adds extra delays which isn't very helpful.

Fortunately the deployment process through Visual Studio, especially for SharePoint projects, is extremely extensible which means you can control what happens when a deployment it done. There a couple of different out of the deployment configurations, for example Default and No Activation. Both will deploy Features to the site in the same way, except Default will also activate it. You can extend these and even write your own actions and if you install something like the CKSDev toolkit you can get some extra deployment configurations like Quick Deploy, Upgrade Solution etc which can be helpful. Another option is tying custom commands, like PowerShell which is what I'm using here.

In my case I want Visual Studio to deactivate/activate my Feature on a number of different sites, which can all be achieved through PowerShell and the standard commands that come with SharePoint. Broadly speaking I want Visual Studio to do the following:

  1. Compile, package and Deploy my Feature as normal
  2. Then loop through my sites and deactivate (if required) and activate

Everything in step 1 is done automatically by Visual Studio the only thing I'm changing is to switch the 'Active Deployment Configuration' to 'No Activation'. You don't have to, but I'd prefer having all my sites handled by the same script. So in this case, Visual Studio is only going to deploy my Feature, without activating it. For step 2 there are two parts which need changing. Firstly we have to create a PowerShell file which contains our scripts and secondly we have to amend the 'Post-deployment Command Line' which calls our custom script.

The PowerShell

For this, I just create a ps1 file at the root of my project (you can put it anywhere within the project structure). Since I only want this file to be used in Visual Studio I'm keeping the 'Copy to Output Directory' set to 'Do not copy'so it shouldn't be included in builds. This is the content of my file:

write-output "Running post-deployment scripts"

$snapin = get-pssnapin | where { $_.Name -eq "Microsoft.SharePoint.PowerShell" }

if($snapin -eq $null)

{

Add-PsSnapin Microsoft.SharePoint.PowerShell

}

$featureId = new-object System.Guid("00000000-0000-0000-0000-000000000000")

$deployableSites = "http://site1","http://site2","http://site3"

foreach($webUrl in $deployableSites)

{

$site = get-spsite $webUrl

$solution = $site.Features | where {$_.DefinitionId -eq $featureId}

if ($solution)

{

write-output "Disabling Feature for $webUrl"

disable-spfeature $featureId -url $webUrl -Confirm:$false

}

#Enable Feature

write-output "Enabling Feature for $webUrl"

enable-spfeature $featureId -url $webUrl }

The script it fairly straight-forward -

  1. Firstly we need to pull in the SharePoint PowerShell snapin
  2. Define the Feature Id and sites to deploy to 
  3. Then loop through each site, checking if it is currently available deactivate it and then activate it

You can write your script to do pretty much whatever you need it to – as long as you can write the script!

The Post-Deployment Command Line

With SharePoint we can right-click on a project, which brings up the Properties and we can head to the SharePoint tab which gives us the option to run commands both pre and post deployment. Typically this takes command line so we need to call out to PowerShell. The thing is, it's not just a case of calling out to PowerShell because of the whole 32 vs 64bit software. SharePoint as you know is 64bit, which is required for its PowerShell commands, however Visual Studio is still 32bit and so by default will call the 32bit version of PowerShell. If you try loading the SharePoint snapin in 32bit PowerShell you'll get this error:

Add-PSSnapin : The Windows PowerShell snap-in 'Microsoft.SharePoint.PowerShell' is not installed on this machine.

So instead, we need to tell Visual Studio to load the 64bit PowerShell instead which we can by referencing:

%windir%\sysnative\windowspowershell\v1.0\powershell

Now it's simply a case of passing in our deployment script we created before and deploying!

PowerShell deployment command in VIsual Studio

So the final command line is:

%windir%\sysnative\windowspowershell\v1.0\powershell -file "$(ProjectDir)PSDeploy.ps1"

Further options

This is just a simple example of how how we can incorporate PowerShell into a deployment process in Visual Studio to roll out our Features to multiple sites. Of couse the same approach can be used in Pre-deployment and also pre and post builds. So depending on when you need scripts to run you can place them where their needed.


SharePoint 2013 Preview – Initial look as a Developer

SharePoint 2013 Preview has been released for a while now and figured it was time that I contributed to the growing number of articles and information that is being made available. Having read around a lot of the changes I'm particularly interested into what things we can expect as developers – what can we do now that we couldn't before, what things have changed and what things are no longer available. If I look at the typical things I do day-to-day – creating Content Types, List Definitions, workflows, web parts etc – what do all of these look like in 2013? Can I approach these in the same way as I did in 2010 or are the new aspects I need to consider? 2013 may introduce new components which means I can approach some of the development differently. These are the sort of questions that I'm trying to look at and answer so that when 2013 is released and I start working on projects I can do things the right way!

I am very much going to look at this from the Visual Studio side of things – SharePoint development isn't just about Visual Studio but since that is where I spend a lot of my time with the projects I work on so that's where I'm starting.

The App Model

This is perhaps one of the biggest changes that will impact developers as it opens up a number of different options on how we produce customisations and how we package them up. As with 2010 we had the option of building Farm or Sandbox solutions, with 2013 the main options are Farm or Apps (Sandbox is technically still available but deprecated). So if you've tended towards Sandbox solutions with 2010 then the Apps are definitely going to be of interest. The new App model is well worth reading up on as there is a lot to it and it introduces new ideas on how we can approach things. For a couple of starting points, the full Microsoft explanation can be found on MSDN and another article I found very useful was one that Eric Shupps wrote which you can find here.

So what is it with Apps? With SharePoint 2010 we gained the idea of 'Sandbox Solutions', being able to run code in a more restricted manner, limiting what it could access, the context it ran under etc. The App model in 2013 takes this idea much further – it not only changes how we can deploy customisations to SharePoint but also determines what we can deploy and where they are deployed to. We can now build apps that contain no server-side code which entirely runs client-side making use of things like the SharePoint JavaScript object model. We have options for apps which then don't have to rely on SharePoint at all but can be hosted independently.

SharePoint 2013 allows us to have 3 different types of apps – SharePoint-hosted, Autohosted and Provider-hosted. What goes into each one is worth several articles each so I'm not going to go into detail here – plenty of people have so a quick search online should help get you started.

Whilst the App model is a big component of 2013 we still have the option to create the more traditional Farm solutions with SharePoint 2013. These are build, packaged and deployed pretty much in the same way as 2010. In 2010 the recommendation was start with a Sandbox and only switch to a Farm solution if you have to, a similar thinking it being applied in 2013 – start with an app! If you can accomplish what you need to do with an App, build it as that.

How does this look in Visual Studio 2012?

Before you start looking at Visual Studio you may need to setup your development environment so that you can host you apps locally. Here's the link to MSDN on how to do – again lots of people have also detailed this online so there are a number of good resources available.

How to: Set up an on-premises development environment for apps for SharePoint

Assuming you have everything setup, the first step is to create a new Visual Studio Project. As long as you have installed the SharePoint Tools (as part of Office Developer Tools for Visual Studio 2012) you should find the option to create a  'App for SharePoint 2013′ which you should find under the 'Office/SharePoint' category. If you want to create a Farm solution then you can find this option under 'SharePoint Solutions' and 'SharePoint 2013 Project'.

(Note – the first time I installed Visual Studio 2012 and the SharePoint Extensions I found that Visual Studio didn't contain any templates for SharePoint 2013. The category was listed, but the template 'App for SharePoint 2012′ was missing. I don't know what the issue was but after uninstalling and reinstalling Visual Studio 2012 it fixed the problem).

Visual Studio 2012 - Creating an App Project Step 1

This next screen is where we can specify what site to deploy to, but rather than selecting 'Farm' or 'Sandbox' Solution, we now get a choice for SharePoint-hosted, Auto-hosted and Provider-hosted. At this point you should know what your app needs to do and so what type of app you will be creating. In 2010 it was straight-forward to change a solution between Farm and Sandbox, with the apps it isn't so straight-forward as the projects contain different elements!

Visual Studio 2012 - Creating an App Project Step 2

What gets created next will depend on what option you select as Visual Studio creates different elements within the project based around what you choose.

SharePoint-hostedAutohostedProvider-hosted
SharePoint Hosted Default Project

You can see that the projects that are created are different between SharePoint-Hosted and the other two – the key difference being that the Autohosted and Provider-Hosted projects also include a web component. This is done to how the different apps are physically hosted. In the case of a SharePoint-hosted app, the app itself lives within your SharePoint site where as the other two are hosted externally – hence the sites.

Once your app project has been created you can start developing. Of course there are different ideas to developing. If you're building a SharePoint-hosted app for example then you'll likely need to work with the JavaScript object model and possibly jQuery. This might be quite different to the type of development that you've been used to. I know for me that I've not really done much work with the client object models in 2010, so that will take a little getting used to. The good news is that most of the client object models haven't changed that much so if you've used them in 2010, 2013 should be almost the same.


A lot of great information has already been published by people on 2013 and I'm sure over the coming months we'll see more and more information being made available. Whether you're going to be picking up 2013 the day it is released or not I would suggest starting to read up on it!


Office365 setting up email in Exchange Online using a custom domain

Before you can use Lync, SharePoint Online and Exchange Online with a custom domain you need to add your custom domain to Office365. Follow these steps to complete setup of Exchange Online.

1. "Edit domain intent" of the domain to include "Exchange Online"

2. Get the DNS settings and add the records to your DNS  these will look something like this:-

DNSSettings

The @ that is in the Host name and the TXT Name didn't work for me, I left this blank and it worked well.

My settings look like this:

ExchangeonlineDNS

One hour is express in seconds I think but it didn't make any difference.

3. Create a user with the new domain – you can select the domain when creating the user.

4. Assign an exchange license to the user.

5. That's it – your new user should now be joe.bloggs@customdomain.com  for example. Login as this user and send a few test emails before setting everyone else up.

Office365 Trial