Setting up People Search in SharePoint 2013

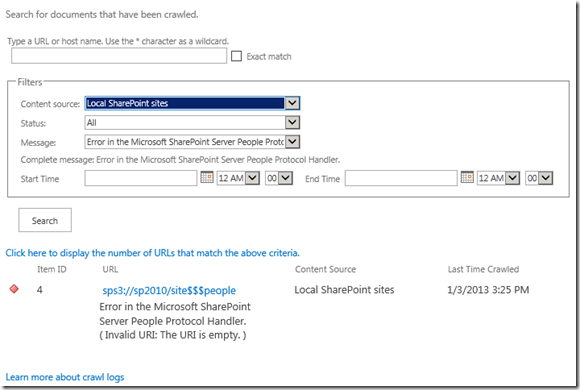
 People Search requires you to have the User Profile Service Application up and running as well as My Sites. If you don't have either of those configured, People Search will not work and you will likely see an error like the following in your crawl log.

Error in the Microsoft SharePoint People Protocol Handler. (Invalid URI: The URI is empty.)

SearchCrawlLogPeopleSearchError

User Profile Synchronization Application

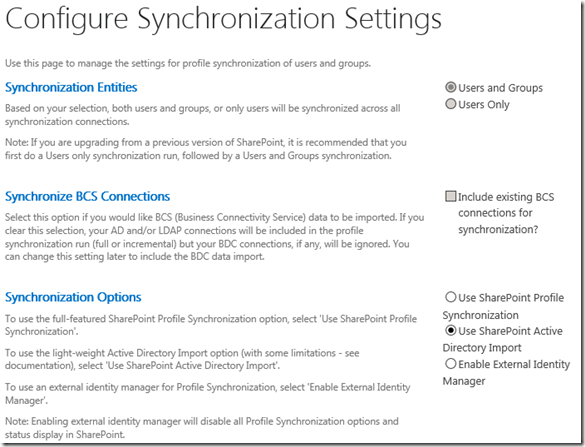
Let's start with configuring the User Profile Service Application. We need this to retrieve user profiles from Active Directory so that search can use them. If you already have your profiles imported, you can skip this section and proceed to My Sites. The nice thing about SharePoint 2013 is that you can set it up the easy way now with the new (well old from 2007) synchronization option called Use SharePoint Active Directory Import. You can still using the full sync if you want, but for those of you that don't want to mess with the pain you had with UPS in the past, give this a try. You can always change it later. If you already have profile synchronization working, there is no reason to mess with this setting. To get to this setting, go to your User Profile Service Application –> Synchronization Settings. Choose the option Use SharePoint Active Directory Import and click ok. You'll get a warning mentioning it's limitations after that.

UPSSynchornizationSettingsUseADImport

Once you are done here, go to Configure Synchronization Connections and Create New Connection. Again, you don't need to do this if you already have synchronization up and running. Enter the name of your domain, provide an account that has credentials. This account does not need to be a domain admin (nor should it be). Click Populate Containers and select the OUs that you want to import and then save the connection. Back on the UPSA page, go to Start Profile Synchronization and select Start Full Synchronization and click OK.

My Sites

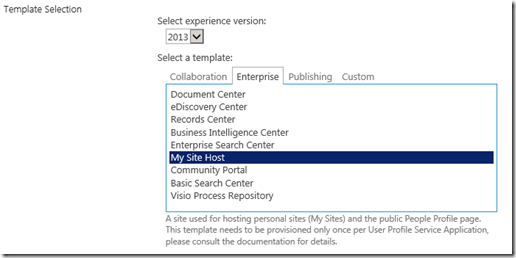
We now need to configure My Sites. Typically this is hosted on a new web application but it doesn't have to be. Now, you need to create a My Site Host. To do this, create a new site collection on the root path (/). Choose the My Site Host template and create the site collection.

MySiteHostNewSiteCollection

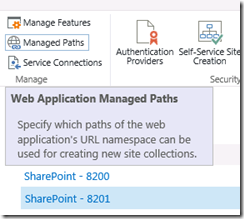
Once you have created this web application and set up it's site collection, you will need to create some managed paths for it. To do this, select the web application that host My Sites and click Managed Paths in the ribbon.

UPSWebApplicationsManagedPaths

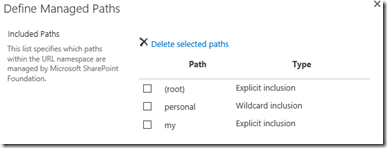
On this screen, remove the existing Sites managed path. Then add a wildcard inclusion for personal and a explicit inclusion for my.

MySitesDefinedManagedPaths

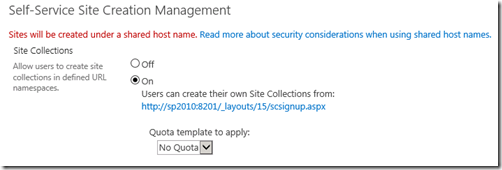
Now, we need to enable Self Service Site Creation. Return to the Web Applications page and click the Self-Service Site Creation. From here, select On and click Ok.

MySitesSelfServiceSiteCreation

Search

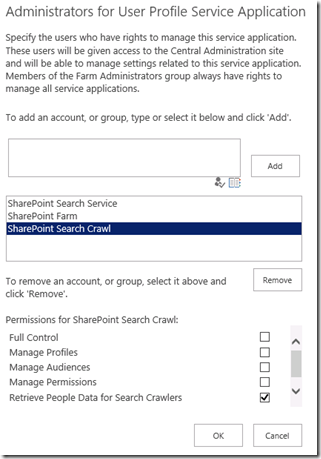
At this point, you may be good to go. However, there are a few settings that you should verify. First, go to the Service Applications page. Select your User Profile Service Application but do not click on the link. Instead click on the Administrators button. Typically, what you will find here is that when the Search Service Application was created, it adds the Search service account to this list. However, if you change the default content access account (as you should), it will not get updated here automatically. Therefore, you need to add your crawl account to this list and choose the Retrieve People Data for Search Crawlers permission.

UPSPeopleSearchAdministrators

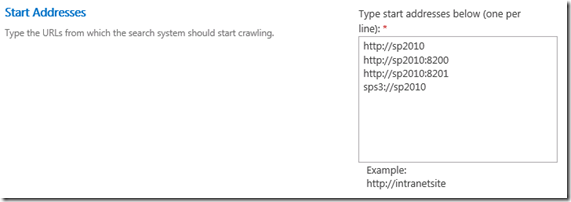
Now, we are probably ready to crawl, but it's worth checking the content source to be sure. Go to your Search Application –> Content Sources. Edit your default content source (typically Local SharePoint sites). Ensure that there is an entry with the sps3 protocol handler (i.e.: sps3://myserver) in the start addresses. You only need one sps3 entry and typically it is just the URL of the first web application you happened to create. It does not have to be the URL of the My Site Host.

PeopleSearchContentSource

Once you have confirmed these URLs are correct, you can start an incremental crawl. When it finishes, you can go to you will be able to go to your search center and search for people in your organization. If it doesn't work, return to your Search Service Application and view your crawl log. There usually is something there to help indicate what the problem is.
Working with links in a Client Web Part with SharePoint 2013

If you've followed Building a SharePoint-hosted Client Web Part in SharePoint 2013, you have a good start on working with Client Web Parts with the new SharePoint 2013 app model. In an app part, everything you do is inside an IFRAME. You need to remember this whenever you create links inside your App Part. This provides a small level of complexity but it's not that bad when you think about it. Let's start by taking a look at what it will take to link to the default page of the app. Typically this page is called default.aspx and is hosted at a URL like the one below.

http://app-4715ba34d5bfe2.apptest.local/sites/developer/HelloWorldApp/Pages/Default.aspx

Effectively this url, has a prefix (app), an Id, a subdomain hosting the apps, the current site I am running it on (developer site), followed by the app name and finally the Pages folder (which matches the name I have in Visual Studio). The .aspx page hosting your Client Web Part also typically sits in this folder as well. In my case it's called HelloWorldClientWebPart.aspx. That means, if I want to create a link in my Client Web part to the app's default page, I should be able to do so with a relative link like this:

<a href="default.aspx">Go to app default page</a>

This will get me to the page, but unfortunately here is the result:

ClientWebPartNoFramingError2

The link works but that page is designed to run in the full browser so it doesn't have the AllowFraming tag. Fixing this is simple though. Just add target="_top" to have the link navigate the parent frame instead of the IFRAME. The link now looks like this:

<a href="default.aspx" target="_top">Go to app page 2</a>

Now the link will work.

Another common scenario you might run into is linking to a related list. In this case, I have a list called TestList with a relative URL of Lists/TestList. We can get to this, but we need to use a relative path and go up one folder first since the page executes out of the Pages library. Here is what that link would look like.

<a href="../Lists/TestList" target="_top">Go to list</a>

Lastly, there may be a time when you want to retrieve the URL to the app web from the client web part. You can do this with some CSOM. Start by getting a reference to the app web.

var context;

var web;

context = new SP.ClientContext.get_current();

web = context.get_web();

You then need to load the context for the web object and then execute a query.

context.load(web);

context.executeQueryAsync(onUrlRequestSucceeded, onQueryFailed);

On the success method, you can read the URL. I then get a reference to the link on the page I want to update and assign the href attribute.

function onUrlRequestSucceeded() {

var appWebUrl = web.get_url();

$("#MyLink").attr("href", appWebUrl);

}

This gives you some options for working with links. It's not entirely complicated, but I thought it was worth a quick write-up.


Building a SharePoint-hosted Client Web Part in SharePoint 2013

I am extremely interested in the new SharePoint 2013 App model so I have been doing a lot with them lately. The latest thing I was trying was building a SharePoint-hosted Client Web Part. I have found that there is not a lot of information out there yet on how to use these so I wanted to share some of the things I ran into. This post on MSDN is good to help you get started with the setup of your app. Hopefully this info will help you get started. This post assumes you have installed Visual Studio 2012 RC as well as the SharePoint development tools.

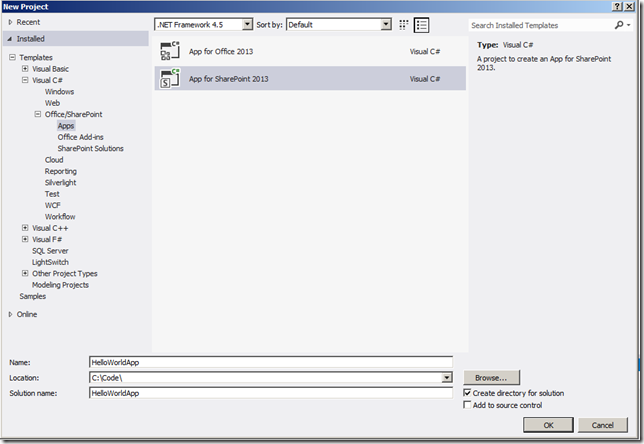
After you open Visual Studio 2012 RC, create a new SharePoint app by choosing Office / SharePoint –> Apps –> App for SharePoint 2013.

VS12RCNewSharePointApp

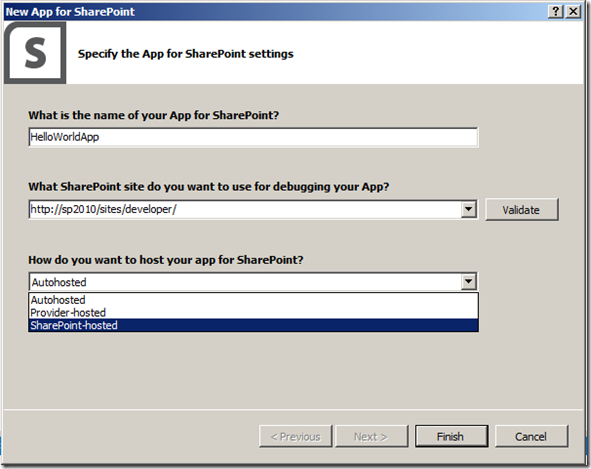
You'll then be prompted for the type of app as well as a name and deployment location. For the deployment location, you need to specify the URL to a site created with the Development Site template. I created a new site collection for this. I am not sure if it is required or not but I am fairly certain it is.

VS12RCNewAppSettings

At this point, you'll have a new SharePoint-hosted App project. Now, we just need to add the pieces that we need. However, first you need to understand a little bit about the ClientWebPart. This new type of web part is essentially two pieces: an elements.xml file and an .aspx page. The elements.xml file performs many of the same functions as a .webpart file, but it has different parameters. It's main purpose is to specify the path to a .aspx page which it then loads in an IFRAME. Since it is an IFRAME, this page can actually be hosted anywhere: locally, on a remote web server, or in Azure. However, hosting it locally inside SharePoint is by far the simplest.

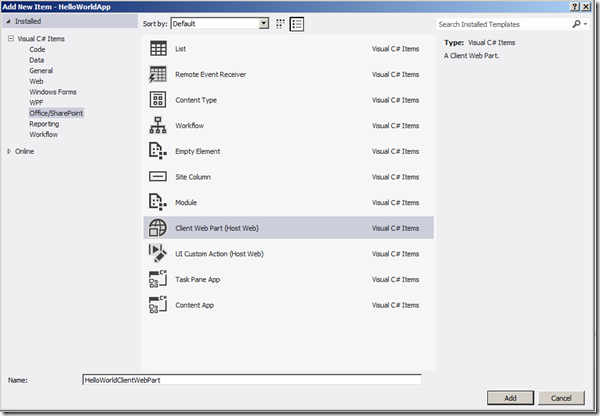
We'll create the Client Web Part using the New Item menu:

VS12RCClientWebPartSPI

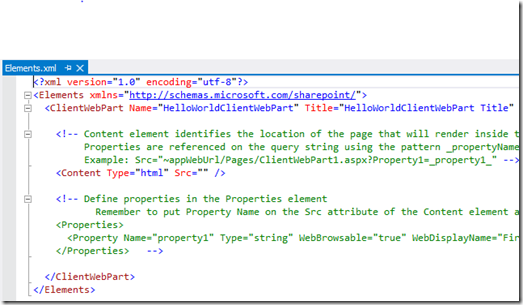
When the Client Web Part is created, you'll get an XML file that looks like this.

ClientWebPartNewXml

You can update the Client Web Part title, description, and size here. Note, that end users can't change the size of the Client Web part once it's deployed so set the value correctly here. Note the Content element. We need to update this value to the location of the associated page we are about to create. We need to specify the URL to the page associated with our ClientWebPart. To do this we make use of the ~appWebUrl token and then just specify the relative path Pages/HelloWorldClientWebPart.aspx. Here is what the entire XML looks like.

<?xml version="1.0" encoding="utf-8"?>

<Elements xmlns="http://schemas.microsoft.com/sharepoint/">

<ClientWebPart Name="HelloWorldClientWebPart" Title="HelloWorldClientWebPart" Description="This is my awesome HelloWorldClientWebPart." DefaultWidth="300" DefaultHeight="200">

<!-- Content element identifies the location of the page that will render inside the client web part

Properties are referenced on the query string using the pattern _propertyName_

Example: Src="~appWebUrl/Pages/ClientWebPart1.aspx?Property1=_property1_" -->

<Content Type="html" Src="~appWebUrl/Pages/HelloWorldClientWebPart.aspx" />

<!-- Define properties in the Properties element

Remember to put Property Name on the Src attribute of the Content element above

<Properties>

<Property Name="property1" Type="string" WebBrowsable="true" WebDisplayName="First Property" WebDescription="Description 1" WebCategory="Custom Properties" DefaultValue="String Property" RequiresDesignerPermission="true" />

</Properties> -->

</ClientWebPart>

</Elements>

You can pass properties from the the user enters from ClientWebPart itself to the page here, but we'll cover that in another post.

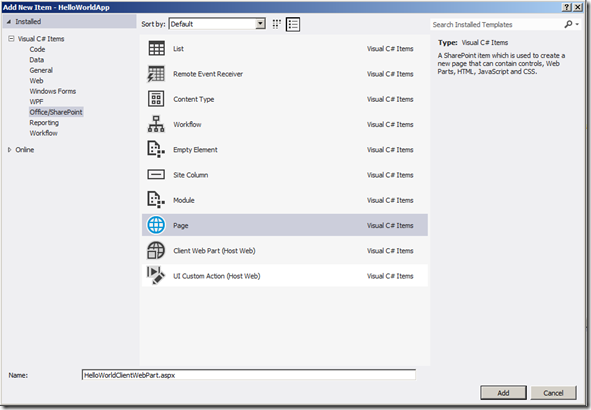
Now, we need to create the page that will be loaded in the IFRAME by the Client Web Part. For simplicity, I go with the same name as the Client Web part.

VS12RCPageSPI

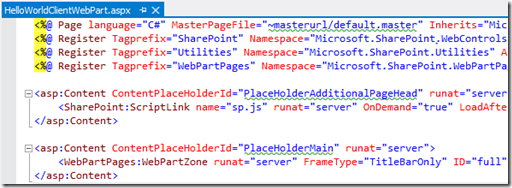
The default page looks like this.

ClientWebPartPageDefault

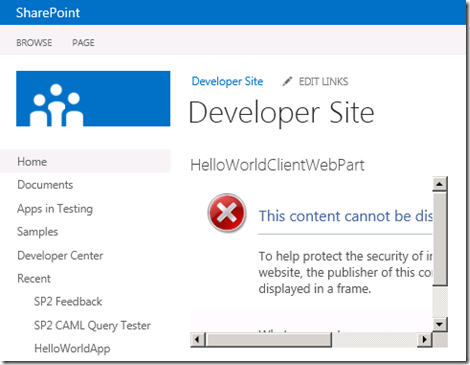
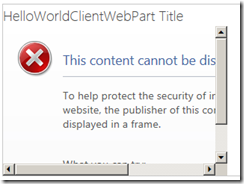
It's this part where I couldn't find any details on how to proceed. You might be wondering if you need to do something to this page before it will work in a Client Web Part. The answer is "yes". If you do try to deploy it as is, you'll get the following error when trying to use the Client Web Part.

This content cannot be displayed in a frame.

ClientWebPartNoFramingError

Luckily, Saurabh Bhatia came through for me in the forums and helped me out. You need to include the AllowFraming tag in your page to allow it to render in an IFRAME. Everything else in the page needs to go with the exception of the reference to the WebPartPages tag. If you leave references to the master page or content place holders, you'll receive a heap of JavaScript errors. Here's what my complete page looks like.

<%@ Register Tagprefix="WebPartPages" Namespace="Microsoft.SharePoint.WebPartPages" Assembly="Microsoft.SharePoint, Version=15.0.0.0, Culture=neutral, PublicKeyToken=71e9bce111e9429c" %>

<WebPartPages:AllowFraming ID="AllowFraming1" runat="server" />

<div>Hello World Client Web Part!</div>

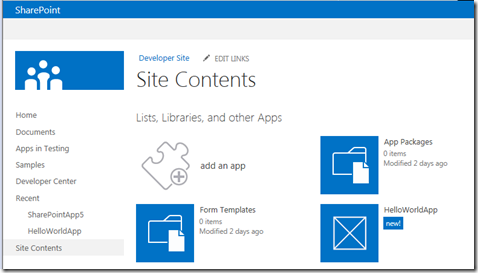
At this point, we are ready to deploy. You can do so by pressing F5 or choosing Build –> Deploy. This will package your app and after a moment, you'll see your app listed.

DeveloperSiteApps

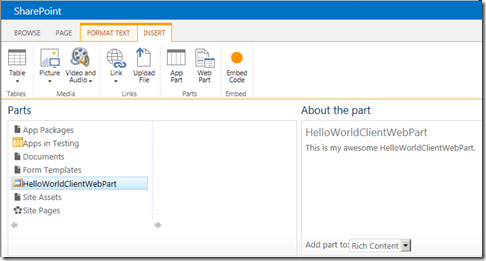
This is a Client Web Part so you don't need to click on your App here. Instead, go to the Home Page and then edit it. Pick a place on the page and then click on Insert in the ribbon. You'll notice this looks a bit different, choose App Part and you'll see your new Client Web Part listed.

PageInsertAppPart

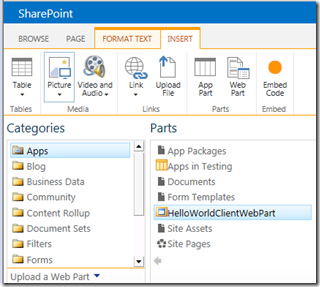
You might be wondering what the difference between this and Web Parts are. Not much really. If you click Web Part and then choose Apps and you'll see the same list.

PageInserWebPartApps

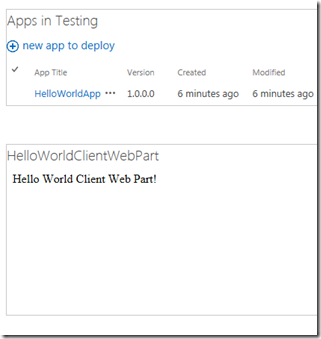
If all goes well, your Client Web Part should now be visible on the page. You may be prompted for authentication again when it loads. You can adjust your browser security settings to avoid this.

ClientWebPartOnPage

At this point, you have a working Client Web Part. You can then make use of the Client Object Model or the new REST API to interact with SharePoint. I hope this helps you get started with building some apps. Try it out and see what you can do.


How to Create SharePoint Ribbon Custom Actions with Visual Studio 2012

Let's face it. In SharePoint 2010, creating ribbon custom actions was not a very pleasant experience. You had to know the inner workings of the XML and the black-magic behind selecting the right Id in the CommandUIDefinition. We had community tools like CKSDEV to help though. Now, I am happy to see that a new Ribbon Custom Action SharePoint Project Item slipped into Preview 2 of the Office Developer Tools. This new SPI provides a nice wizard interface to guide you through the process of creating an action. Let's take a look at it.

First, you'll need to create a new SharePoint App project. The downside of the tool is that it is only available for SharePoint apps. It's not in regular SharePoint 2013 projects. In my example today, I am going to attach a custom action to a list item to take the user back to the default.aspx application page. Of course, you can use traditional techniques as before to add JavaScript, pass parameters, and whatever else you need to do. I just want to show you what the wizard looks like today.

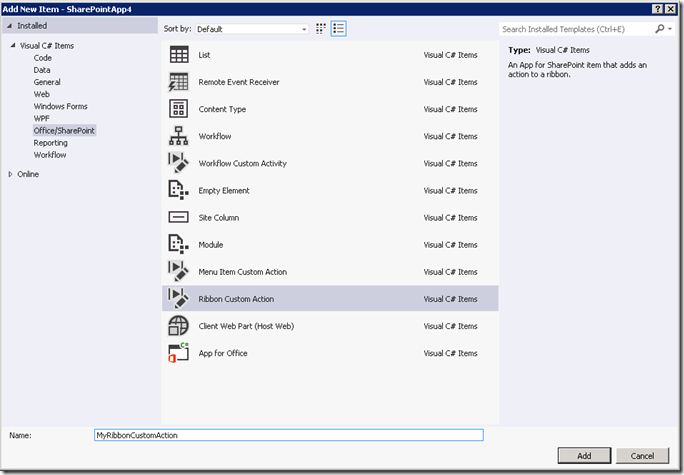
In the Add New Item menu, you'll see the new wizard here. Choose Ribbon Custom Action and give it a name.

RibbonCustomActionSPI

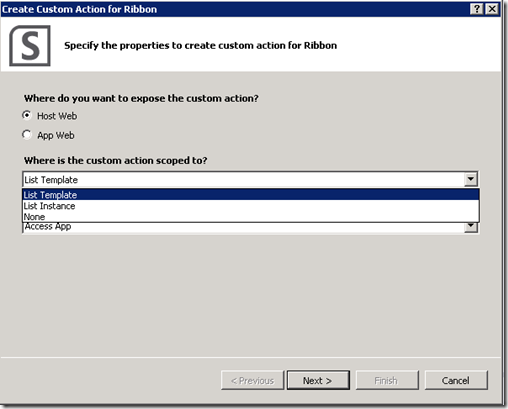
Note, that there is also a new Menu Item Custom Action template as well. When you click Add, you will be taken to the next step in the Wizard. Here you first need to choose whether you will apply this to the Host Web or the App Web. Remember that the App Web that has all of the pieces of your app and the Host Web is the site that hosts an instance of your app. One way you might use this new feature is that a user clicks on an item in the host web, uses the ribbon action and gets redirected to your app.

You have the ability to bind the custom action to a list template or a list instance. If Host Web is selected, selecting List Instance will provide you with a list of all instance on the particular host web that your app is currently configured to publish to. Otherwise, if you choose List Template, it will provide you a list of common templates. I don't think the Wizard will let you pick a custom template, so you would probably have to edit the XML manually when you are done.

CustomRibbonActionWizardHostWebListTemplate

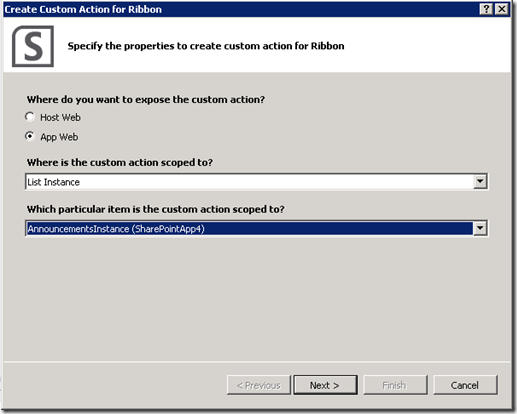
In my case, I have chosen App Web and then a specific List Instance. It knows to look through the List Instances you have in your project and put them in the list.

CustomRibbonActionWizardAppWebListInstance

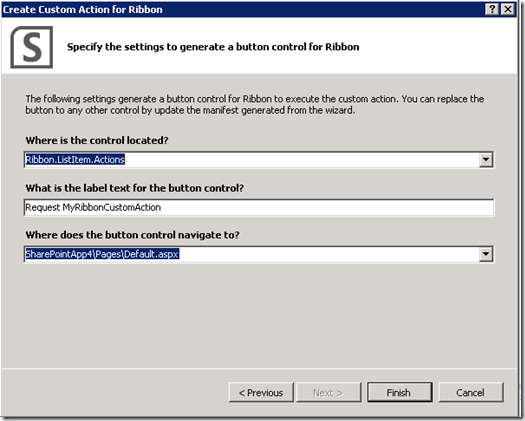
When you continue to the next step, it will allow you to specify the location of the ribbon, the text to display, and what page the user should be redirected to when clicking the link. You can select any existing ASP.NET page in the project for the action to navigate to. If you want to execute JavaScript instead, you would need to edit the XML once you complete the wizard.

RibbonCustomActionWizardStep2

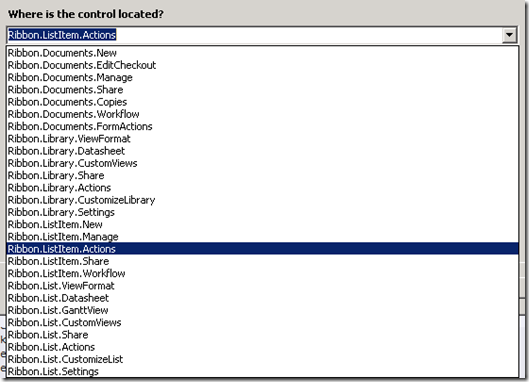
It provides you with a list of locations that the control can be located at:

RibbonCustomActionWizardStep2ControlLocation

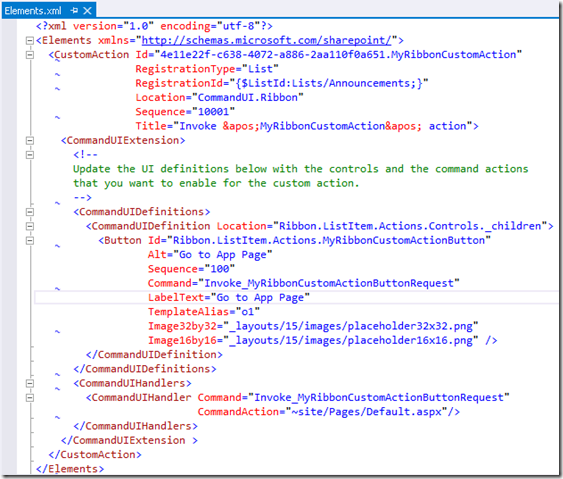
When you are finished, Visual Studio generates the XML that you need. You can make edits as necessary. However, at this point there is no going back to the Wizard and making changes. If you want the Wizard again, you'll have to delete the item and recreate it.

RibbonCustomActionXml

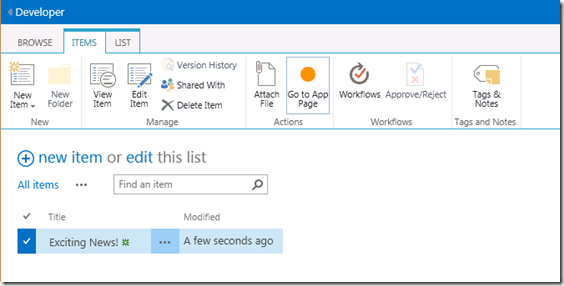
At this point we can run the project and go to the list that we set the action on. Selecting the list item, will expose the action in the ribbon.

RibbonCustomActionVisibleOnList

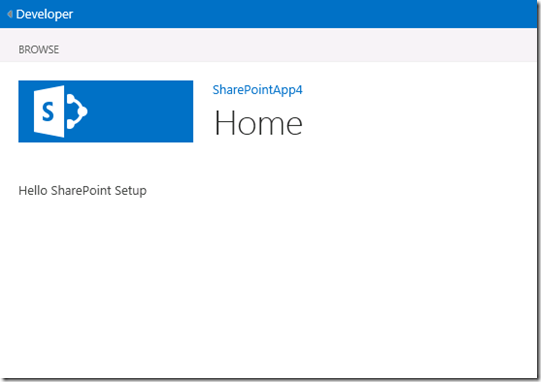
Clicking on the Ribbon Action, I then get redirected to my app home page.

RibbonCustomActionDefault

I'm pretty excited about this feature since I have always struggled with creating custom actions. I think this will make it much easier to create actions now. This is important because this is one of the key ways to link between the host web and the app web. Unfortunately, this action is only present in Apps, but you could always cut and paste it into another project. You could also likely take the code it generates and use it in your SharePoint 2010 projects as well.


Using the SharePoint 2013 Search KeywordQuery Class

Over the past few versions of SharePoint, I have provided a number of blog posts on how to query search. Of those, my posts on how to use the KeywordQuery class using KQL are some of the most popular (2010 and 2007). In continuing that tradition, I am proud to present the "How to" post on using the KeywordQuery class in SharePoint 2013. The good news: your old KeywordQuery code should still work. The bad news: the way you did it is marked completely obsolete. I actually had to dig through quite a bit of documentation to find the right API that wasn't obsolete. One thing that always provided confusion was that there were similar classes named KeywordQuery in both Microsoft.Search.Query and Microsoft.Office.Server.Query. To reduce some of that confusion, the KeywordQuery class in Microsoft.Search.Query is now marked as obsolete. The new updated class is in Microsoft.Office.Search.Query. Microsoft may have killed the word Office from the name of the product in 2010, but it's alive and well in the API.

Now let's talk about what we need to execute some queries with our code. The code here today will work well from farm solutions in SharePoint as well as other .NET applications hosted on the same SharePoint server. We'll be building a console application today. If you want to query remotely using the object model, then you will need to use the Search Client Object Model which I covered previously. Create a new console application, and then you will need to add a few references. These can be found in the 15 hive in the ISAPI folder. Add the following:

  • Microsoft.Office.Server
  • Microsoft.Office.Server.Search
  • Microsoft.SharePoint
  • Microsoft.SharePoint.Security

The classes we need are in the search assembly but you'll get lots of errors about dependencies missing if you don't include the others. We then need the following references. This gives us what we need for search, SharePoint, and for the underlying datatable object that is available after we query.

using System.Data;

using Microsoft.SharePoint;

using Microsoft.Office.Server.Search.Query;

Once we have this, we're ready to get started. There are many ways to instantiate a KeywordQuery object. For simplicity, I am just going to pass a SPSite object for one of my site collections.  We'll first, get our SPSite object.

using (SPSite siteCollection = new SPSite("http://server/sitecollection"))

We then create a KeywordQuery object using that site collection.

KeywordQuery keywordQuery = new KeywordQuery(siteCollection);

Now, we specify our query using the QueryText field. This is where you can use your custom KQL queries. The documentation team updated the post on this so there are a lot of good tips here. I am just going to search for the word SharePoint.

keywordQuery.QueryText = "SharePoint";

In the past, we would then set the ResultsProvider and ResultTypes that we want, but now we don't have to. In fact, this whole process takes considerably less code. Instead we use the new SearchExecutor class that I first mentioned in my Client OM post.

SearchExecutor searchExecutor = new SearchExecutor();

We then use it's ExecuteQuery method passing it our KeywordQuery class.

ResultTableCollection resultTableCollection = searchExecutor.ExecuteQuery(keywordQuery);

Assuming it executes correctly, we can then get our search results. Before, we used to use an indexer using ResultTypes.ReleventResults to get the table of results we need. The indexer has been made obsolete, so now we must use the new Filter method. I figured out what it required from the obsolete descriptor of the indexer. For the first value, it needs a string with a value of TableType and since the previous enum is also obsolete, we now use KnownTableTypes.RelevantResults.

var resultTables = resultTableCollection.Filter("TableType", KnownTableTypes.RelevantResults);

It returns an IEnumerable<ResultType>, so we need to filter it. I just FirstOrDefault() to get the table we need.

var resultTable = resultTables.FirstOrDefault();

Previously, we then had to load the data into a DataTable which took a few more lines of code. However, now that is not required due to the new Table property.

DataTable dataTable = resultTable.Table;

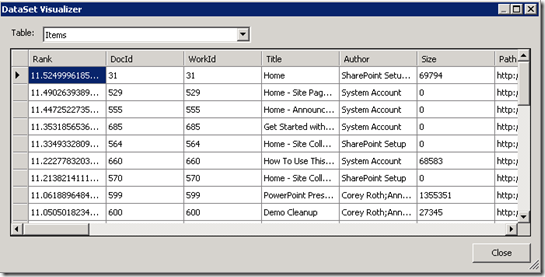
Now that you have a DataTable, you can bind it or query it as you see. You can also look at the results using the visualizer in Visual Studio.

KeywordQueryDataSetVisualizer

Here is the entire code snippet.

using System;

using System.Collections.Generic;

using System.Linq;

using System.Text;

using System.Threading.Tasks;

using System.Data;

using Microsoft.SharePoint;

using Microsoft.Office.Server.Search.Query;

namespace SearchConsoleApplication1

{

class Program

{

static void Main(string[] args)

{

using (SPSite siteCollection = new SPSite("http://server/sitecollection"))

{

KeywordQuery keywordQuery = new KeywordQuery(siteCollection);

keywordQuery.QueryText = "SharePoint";

SearchExecutor searchExecutor = new SearchExecutor();

ResultTableCollection resultTableCollection = searchExecutor.ExecuteQuery(keywordQuery);

var resultTables = resultTableCollection.Filter("TableType", KnownTableTypes.RelevantResults);

var resultTable = resultTables.FirstOrDefault();

DataTable dataTable = resultTable.Table;

}

}

}

}

So if you have a lot of search based code, you may need to do some updates at some point. However, I think these are good changes and simplify the process a little bit. In an upcoming post, I'll cover some of the new things you can do with the KeywordQuery class.