SharePoint Applied: What you should know about The MasterPage in SharePoint 2010

MasterPages were first introduced in SharePoint 2007. Just like in ASP.NET, they allow you to define a base layout, minimum criterion and even some basic logic for all pages that choose to use that master page.

The recommendation in SharePoint is to not create pages that do not use a master page. In other words, barring very simple tasks like download.aspx, don’t go around creating ASPX’s that are pure ASP.NET pages with no bearing to SharePoint pages.

The good news, however, is that you do have the capability to create your own master pages in SharePoint 2010 and SharePoint 2007. The even better news is that creating master pages in SharePoint 2010 is a lot cleaner and easier than crafting up SharePoint 2007 master pages.

Branding SharePoint - the 30,000 Foot Overview

Branding SharePoint involves making your SharePoint site your own - making it look like your own, giving it your own colors, your own images, and your own styles. By far, crafting up MasterPages is not the only way of branding SharePoint. You have the ability to use different site definitions to give SharePoint a certain look and feel and feature set. You can edit the CSS or specify alternate CSS. You can use some out-of-the-box master pages, or you can even create your own themes in PowerPoint. In addition, you have the ability to use wikis for very easy content editing and format changes at a page level and you can use many of the preset Web Part pages templates to create pages in a certain specified structure. There are also numerous out-of-the-box Web Parts that let you do some serious branding with XSLT.

For this article, however, I will focus on the master page story only.

SharePoint 2010 is sold in two main categories - free and not free. The not free version is sold in many permutations and combinations. It is important to realize that the not free version of SharePoint is built using the free version of SharePoint, so any master page that is built for SharePoint foundation (the free version), will also work in SharePoint server (the not free version). The converse may not be true, however - of specific mention is the publishing template, available in SharePoint server, intended to be used for WCM scenarios. The publishing template, allows users to author rich and structured content as web pages using SharePoint and is intended for Internet facing scenarios - though many choose to use it for intranets and extranets as well. Since the WCM site is intended for Internet facing sites, it comes with many branding and content authoring facilities - including its own family of master pages. With this background, let’s examine the major categories of master pages available in SharePoint 2010.

V4.Master

This is the staple master page in SharePoint 2010. When you create a SharePoint site based on the default site definition, you are using the v4.master page. This master page is also available in SharePoint foundation. You can see the default look of SharePoint in v4.master in Figure 1.

SharePoint Applied: What you should know about The MasterPage  in SharePoint 2010

Figure 1: The v4.master page.

This page is quite similar to what used to be the staple master page in SharePoint 2007 - the default.master page, but the biggest notable addition here is the addition of the ribbon. The ribbon is this area full of buttons that appears at the top of any page; the cool thing is that those buttons can change depending upon what context you are working in. Not only that, the ribbon is cleverly styled to always stay on top of the page, you should not break this rule. You can see the v4.master’s ribbon in Figure 2, along with how it behaves with scrollbars.

SharePoint Applied: What you should know about The MasterPage  in SharePoint 2010

Figure 2: The ribbon is placed above the scrollbar.

Minimal.master

Master pages are great. They give you so much for free. Any aspx that wishes to use the ribbon and the styling of your site simply uses that master page - how convenient. But sometimes all this help a master page gives you appears like the four scouts that helped an old lady cross the road - Why did it take four scouts? Because the lady was unwilling to cross the road.

The minimal master page has been given to you to solve that need - it gives you some basic navigation controls, but plenty of open space. The idea is that you take control of almost all the page. A good example of such a page would be the start page of the search center (Figure 3). It goes without saying that you shouldn’t overuse this master page as it lacks a lot of basic SharePoint controls. Also, there are standard concepts and styles built into SharePoint such as the s4-nodlg style, if you wish to have ribbon-less pages working in modal dialog boxes.

SharePoint Applied: What you should know about The MasterPage  in SharePoint 2010

Figure 3: The minimal.master in use on the search center.

NightAndDay.master

Now this is a really interesting master page that you will use almost very frequently and invariably temporarily. Temporarily because you will most definitely end up customizing it to suit your Internet facing site needs. When you create a new SharePoint site based on the publishing template, you would see a page as shown in Figure 4.

SharePoint Applied: What you should know about The MasterPage  in SharePoint 2010

Figure 4: The nightandday.master with some strange looking people on the home page.

Ever wondered who those people are on this site? Me too! And I have no idea who they are. But what I can tell you is that the publishing site definition is using an out-of-the-box nightandday.master page that is a very clean and well thought out master page for Internet facing sites. If you are working on a serious SharePoint branding project, you probably want to start with this master page. You may notice, however, that the ribbon is nowhere to be seen in this master page. Well, that is one of the peculiar things about the publishing template - the ribbon is hidden by default, though logged in users can choose to see it. And it is hidden completely for anonymous users.

Simple.master

This is a super simple (as the name suggests) master page that is used where you want bare minimum SharePoint functionality. Examples of such pages are unauthenticated pages such as login.aspx, or error.aspx. Note that there is a simple.master, and a simplev4.master designed specifically for SharePoint 2010. Simplev4.master is used in SharePoint by the following pages:

  • Login.aspx
  • SignOut.aspx
  • Error.aspx
  • ReqAcc.aspx
  • Confirmation.aspx
  • WebDeleted.aspx
  • AccessDenied.aspx

default.master

SharePoint 2010 is immensely better than SharePoint 2007. One day I will probably say that SharePoint 2013 (I have no idea what date it will be) is immensely better than SharePoint 2010 too. The reality is that every subsequent version will be better, but business users are stubborn and reticent to change. While you on the IT side may want to take advantage of the new versions, your end users may not be ready, yet! In order to support that short transition time, Microsoft has provided you with a standard out-of-the-box default.master master page that can be applied to any SharePoint site. By doing so, your SharePoint 2010 site starts to look and behave like a SharePoint 2007 site. While this is very cool, you must use this as a transitionary/temporary phase only. You can be assured that there will be functionality in the ribbon that will not be created elsewhere. For instance, the new content editor Web Part exposes a lot of editing functionality only through the ribbon.

Summary

There used to be a joke about SharePoint 2003 - that you can always tell a SharePoint 2003 site, but you can’t tell it much. In other words, branding a SharePoint 2003 site was like you trying to sleep at 2AM because you were worried about an early morning meeting, while a four-year old girl is sticking chewing gum in your hair and her brother is playing a drum. It wasn’t easy! With SharePoint 2007 the story became a whole lot easier - but not easy enough. SharePoint 2007 master pages were complex, and there were many differences and finer points to consider when you started with working with a particular master page, suited for a particular situation. SharePoint 2010 makes the story a whole lot cleaner and better - there is much lesser parity between master pages, the pages are cleaner, and the generated HTML is also much cleaner. Now clearly, that isn’t the whole story - a SharePoint master page is usually far more complex than your regular typical ASP.NET master page. More on that in future articles.

How to display a SharePoint List from another site using the Data View Web Part

In today’s example I will elaborate on the DVWP and provide you with a step by step scenario in how you can display a SharePoint list from one site to another site. You can utilise the DVWP to connect to SharePoint Lists, Libraries, Database Connections etc within any site in a site collection and in today’s example I will replicate and display a SharePoint Calendar list from one Team Site to another Team Site.

The DVWP is hidden within SharePoint Designer (which is now free) so let’s launch SPD.

We need to insert a new web part zone to enable us to insert our Data view web part into our ASPX page.

Navigate to Insert / SharePoint Controls / Web Part Zone. Now that we have our zone created, we can proceed to insert our DVWP.

Navigate to Insert / SharePoint Controls / Data View.

How to display a SharePoint List from another site using the Data View Web Part

You will also notice that our web part zone that we have just inserted has realised that we have requested to add a DVWP and is asking for the source data.

How to display a SharePoint List from another site using the Data View Web Part

By default, the Data Source Library will display SharePoint lists from the current site. In our example we are required to connect to a list (a calendar list in our case) from another team site.

Under the Data Source Library we will click on “Connect to another library” The below screen capture is displayed.

How to display a SharePoint List from another site using the Data View Web Part

Click Add

You will be prompted to specify a display name and location for the collection properties.

How to display a SharePoint List from another site using the Data View Web Part

Click OK and then OK again.

You will then notice that the team site that we have just added will also be displayed under the data source library with its SharePoint lists and libraries.

How to display a SharePoint List from another site using the Data View Web Part

In today’s example we are connecting to and replicating a SharePoint calendar List from the “Assurance Services Team Site” to be displayed on the current site.

I will expand SharePoint Lists and click on the relevant SharePoint List that I will be adding which will display a context menu in which I will click on Show Data. These instructions are also displayed in the web part zone that we have added earlier

How to display a SharePoint List from another site using the Data View Web Part

The data source details (fields) will also be displayed.

How to display a SharePoint List from another site using the Data View Web Part

Highlight the fields/columns that you would like to include in the DVWP.

How to display a SharePoint List from another site using the Data View Web Part

We will now click on “Insert Selected Fields as.. “ and in this example I will click on “multiple item view”

How to display a SharePoint List from another site using the Data View Web Part

The information will then be inserted into the DVWP as follows;

How to display a SharePoint List from another site using the Data View Web Part

We can now be a fit fancy and customise the formatting of some of the fields that are being displayed. The first area of customisation is changing the date format so I will click on the End Time field until the arrow appears.

How to display a SharePoint List from another site using the Data View Web Part

I will now click on DateTime formatting options and select my desired Date Format and deselect Show Time.

How to display a SharePoint List from another site using the Data View Web Part

Click OK

You will now notice that the information in the DVWP will now be displayed accordingly;

How to display a SharePoint List from another site using the Data View Web Part

You will also notice in this example that the “Description” field has come in with html code as opposed to rich text. In this instance I will click on the arrow beside the description column

How to display a SharePoint List from another site using the Data View Web Part

You will notice that the Data Field “Description” is being formatted as Text.

How to display a SharePoint List from another site using the Data View Web Part

I will click on the Format as: drop down and select Rich Text.

The Div tags have now disappeared and the description field is formatted correctly.

I will now make some further customisations, but this time to the entire list such as sorting and grouping etc. You do so by highlighting the entire DVWP and clicking on the arrow beside the web part located on the top right corner.

How to display a SharePoint List from another site using the Data View Web Part

The “Common Data view Tasks” appear in which you have free reign to make further customisations to formatting, filtering, sorting and grouping, conditional formatting etc.

How to display a SharePoint List from another site using the Data View Web Part

After making your customisation we are pretty much done and below is my end result. The first screen capture is the original SharePoint Calendar list “Important Dates to Remember” located in one site and the other is the Data View Web Part that we have just created located in another site.

SharePoint Calendar List – Important Dates to Remember

How to display a SharePoint List from another site using the Data View Web Part

Data View Web Part – Important Dates to Remember

How to display a SharePoint List from another site using the Data View Web Part

step3:Integrating Reporting Services 2008 with SharePoint 2007/SharePoint 2010

Report Creation and Deployment

Step 1 - Create Report Document Library in a SharePoint Site 1 - Open the SharePoint Site we have created in the second post of these posts group

2 - Click "Site Actions", then click Create

3 - On "Create" page in "Libraries" column, click "Document Library"

4 - Type "Reports" as a name for the Document Library, and select "None" for Document Template, click "Create"

In the Quick Launch Menu of your SharePoint Site you notice a new link corresponding to the Document Library you have just created.

4.2 Step 2 - Create Report with the Wizard of Business Intelligence development Studio (BIDS)

1 - Open Visual Studio 2008.
In Start Menu, point All Programs, point Microsoft Visual Studio 2008, click Microsoft Visual Studio 2008.

2 - Choose a new project
In File Menu, point "New", Click "Project".

3 - Select "Report Server Project Wizard", click "OK"

4 - Pass Report Wizard Welcome dialog
click "Next"

5 - Edit Data Source
In Report Wizard "Select Data Source" dialog click "Edit"

6 - Choose and test Data Source
In "Server Name" drop down list, choose your server.
In "select or enter a database name" drop down list, select "AdventureWorksLT2008"
Click "Test Connection"
Click "OK" on the "Test results" message box.

7 - Close the "Connection Properties" windows.
Notice that the "Connection string" field is filled,
Click "Next"

8 - Open Query Builder On "Design the Query" page, click "Query Builder" button.

9 - Add a Data base Table.
In the Query Designer window, click the "Add Table" icon.

On the "Add Table" Pop Up select "Product (SalesLT)".

10 - Select the table columns
In the "Product (SalesLT)" table control, select the following columns:

  • Name
  • productNumber
  • Color
  • StandardCost
  • ListPrice
  • Size
  • Weight

Click OK

11 - Close Query Builder
Notice that the Transact SQL request has been generated and appears in the "Design the Query" dialog.
click Next

12 - Select the Report Type In "Select the Report Type" dialog, select "Tabular", click "Next"

13 - Pass "Design the Table" dialog
Click "Next".

13 - Choose the Table Style
In "Choose the Table Style" dialog select "Forest", click "Next".

14 - Choose the Deployment Location In "Choose the Deployment Location" dialog,

  • for "Report Server" field, type the URL of your SharePoint Site where you plan to deploy the report
  • for "Deployment Folder" field, type the URL of the "Reports" document Library that we have previously created in the SharePoint site

Click Next

14 - Define the Report name
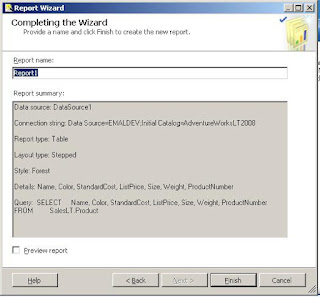
In "Completing the Wizard" dialog, type the report name (I let the default name).

15 - Click "Finish" to close the wizard, and go to the main window of BIDS.

16 - Preview the report in BIDS.
In BIDS click the Preview tab.

Click the Design Tab

4.3 StStep 3 - Define Report properties to prepare deployment in Business Intelligence development Studio (BIDS)

1 - Define project properties
In BIDS Solution Explorer pane, right click Report Project1, click "properties".

In "Report Project Property Pages" dialog, in Deployment Section, fill the following fields that way:

  • TargetDataSourceFolder: Use the same URL that the one of the Report Document Library. In MOSS 2007 it would be different, because you can define special document libraries especially shaped for Data Sources.
  • TargetDataSourceFolder: It is the URL of the Report Document Library as defined with the Report Wizard.
  • TargetServerURL: It is the URL of the SharePoint Site where was created the "Reports" Document Library, as defined with the Report Wizard.

4.4 Step 4 - Build report and deploy report in SharePoint 2007 with Business Intelligence development Studio (BIDS)

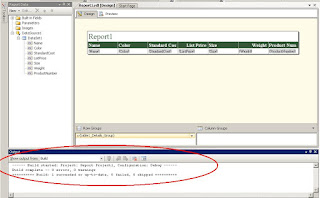
1- Launch Build action
In BIDS Top Menu, click build, then click Build report Project1.

2- Check Build action
In BIDS Output pane, check the Build result.

3- Launch Deployment
In BIDS Top Menu, click build, then click Deploy report Project1.

4- Check Deployment
In BIDS Output pane, check the Deployment result.

4.5 Step 5 Check report deployment in SharePoint 2007 and consume it using RSViewerPage.aspx

1 - Open the SharePoint "Reports" document Library.
Go to your SharePoint site, on the home page in the left Quick Launch Menu click "Reports".

The "Reports" SharePoint Document Library welcome page is opening.
You notice that a file corresponding to the .rdl file deployed with BIDS is present:
Report1

2 - Consume Report1 using RSViewerPage.aspx
Double click the Report1 link or file icon.
The RSViewerPage.aspx is opening and the report is generated.

Do not close the page, but navigate backward to go back to the SharePoint site. You can do it with you browser, or using the bread crumb.
The RSViewerPage.aspx has unfortunately not clear navigation controls linked to the SharePoint site except the bread crumb but you can customize it to fix this lack.

            Customizing the RSViewerPage.aspx Page 


4.6 Step 6 Consume report using SQL Server Reporting Services Report Viewer Web Part


1- Create a Web Part page

Click "Site Actions", then click Create


On "Create" page in "Web Pages" column, click "Document Library"


In "New Web Part Page" page, type the Name (TestReport), select any template, select "Shared Document" as the document library that will welcome your new web part page, then click "create".


The Web Part page is created and is opening in Edit Mode


2 - Add and Configure SQL Server Reporting Services Report Viewer Web Part


In the "TestReport" web part page opened in edit mode, click any "Add Web Part" button.


The Add Web Part Pop Up is opening, and notifies the zone where the Web Part will be added.


Scroll the Pop Up and locate SQL Server Reporting Services Report Viewer Web Part, select it and click "Add".


Notice that the Web Part is now embedded in you Web part page.


Click the "Click Here To open the tool pane" link.


In the tool pane, click the "..." browse button next to the "Report" input field.


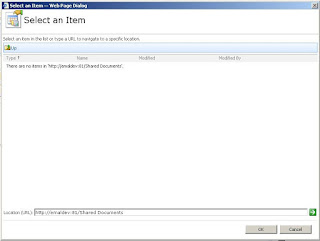
The "Select an Item" Web Page Dialog is opening.


With the "Up" icon link navigate up to display the SharePoint site Document Libraries list, then click the "Reports" Document Library, select the "Report1" previously deployed report and click "OK" or double click the "Report1".


Notice that you can see the ".rdl" extension in the "Location (URL)" input field.


Now the "Report" input field of Web Part Tool Pane is filled with the Report URL.


Click "Apply" the report is being generated.


Click the "Exit Edit Mode" link to display the page in normal mode.


You can now see the second way of displaying a report in SharePoint, using SQL Server Reporting Services Report Viewer Web Part. You notice that in this way, you keep the possibility to navigate in the SharePoint site, while this is not possible with the RSViewerPage.aspx.


4.7 Step 7 - Consume report using ReportServer Web Site


We are now going to use Report Server Web Site to consume the same report we have deployed in SharePoint.

1 - Opening the Report Server Web Site


Open the Report Server Web Site, the URL of which we defined earlier with Reporting Services Configuration Manager in the third post of these posts group. ( Integrating Reporting Services 2008 with SharePoint 2007 Step 3 - Configuring Reporting Services for SharePoint 3.0 Integration - Part 1)


It should correspond to this pattern:


                 http;//yourmachinename/ReportServer


Click the SharePoint Site URL


You will see the different Document Libraries of your SharePoint Site. (You should not see the "Data Connections" link if you have precisely followed these tutorial instructions).


Click the "Reports" Document Library link.


You will see the previously deployed "Report1.rdl" file.


Click that "Report1.rdl" link.


Your report has been generated for the third time, using the third way of displaying a report in SharePoint Integrated Mode.


Relate Posts: